The Attendance activity is designed for instructors or students to record attendance and view attendance history. If enabled, students can record their own attendance using unique passwords or QR codes as assigned by course administration. The following steps will walk you through the setup of VSTAR Learn’s Attendance activity.
STEP 1: Add the Attendance Activity
To add the attendance activity, open your course and follow these steps:
- Turn editing on (Gear icon in top right)
- Click ‘Add an activity or resource’
- Select the Attendance activity
- Fill in the Attendance name
- If you want to track attendance by user Groups, expand the “Common Module” settings to select your group type. See the Advanced Features in STEP 4 below for more detail.
- Change the completion tracking setting in the “Activity Completion” section to “Do not indicate activity completion” (this is completion status is not the same as submitting attendance and can be misleading)
- Select “Save and Display” at the bottom
Be sure to give the instance a name that indicates what it will be used for; for example, “Lecture Attendance”.
STEP 2: Add Sessions
The attendance detail page will be shown after selecting “Save and Display” from Step 1 or by returning to the course and opening your new Attendance activity. Use the following steps to create your schedule of sessions:
- Select the Add session tab at the top of the Attendance page
- Select the student groups to include on the roster if you enabled this above
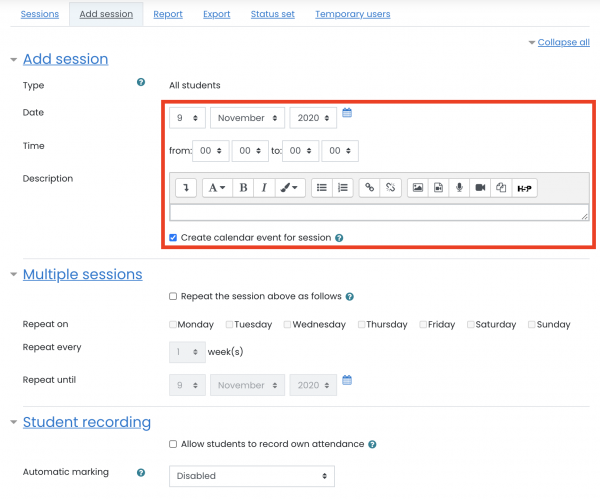
- Fill in the Date and Time details in the Add Session category
- Select “Create Calendar Event for Session” if you would like this session to display on students’ VSTAR calendar
- Expand the “Multiple Sessions” category if your session is recurring
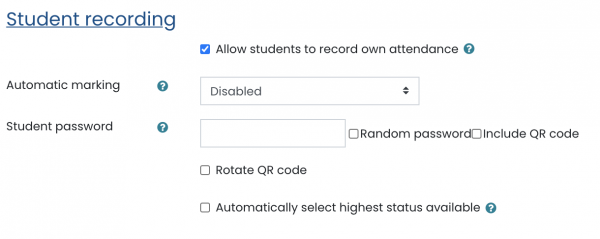
- If you would like students to record their own attendance, check the box in the Student Recording category. See Advanced Features in Step 3 for more detail
STEP 3: Take Attendance
You can choose to either take attendance manually or allow students to record their own attendance (if enabled in above step). If you allow students to record their own attendance, see the Advanced Features in STEP 4 to learn how to use unique passwords or QR codes.
- Open the Attendance activity
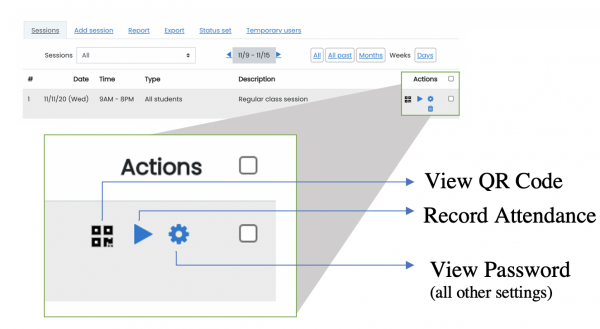
- Select the triangle icon to the right of the session being marked
- In the attendance table, select the appropriate status for each user
- Note that when taking attendance, the column headings for attendance status are links. If you click one of these column headings, all students will have their status changed to the status you selected.
- Enter remarks as appropriate (reason for an absence, minutes late, etc)
- Select “Save Attendance” button to record
STEP 4: Understand Advanced Features
- Creating Custom Attendance statuses
- Students recording attendance: Use Password or QR Code
- Tracking Attendance by Groups
- Attendance Reporting
Creating Custom Attendance statuses
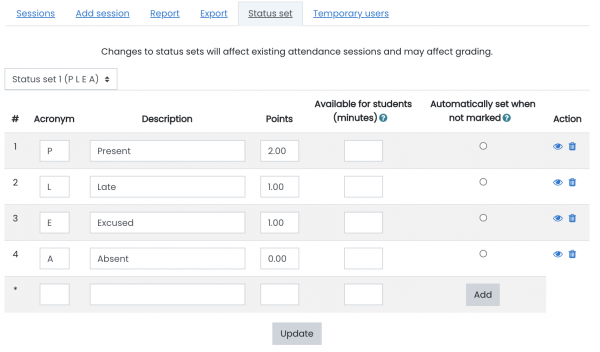
Select the “Status set” tab after opening your Attendance activity to see the acronyms, attendance status descriptions, and grade (points) to assign for each session. Adjust the existing variables as needed, and use the trash can icon on the far right for removal. Important: You must select “Update” at the bottom to save your changes before adding a new status to the “Add” row.
Students recording attendance: Use Password or QR Code
If you allow students to record their own attendance, each session can be assigned a unique password or one you set up in advance. If used, you can display this password to students to allow them mark themselves as present. In addition, you can display a QR code containing a URL that students can scan with a mobile device, which brings them directly to the page where they record their attendance, and fills in the password for them too. Then they only need to select the status “Present”, and record their attendance. In this case, the remarks contain the text “Self-recorded”. Note that students must have a QR Code Reader application on their phone in order for this to work.
If you choose to use a Password, after saving these settings, you can select the gear icon to view the password for each session. This password can then be copied and added to a powerpoint presentation or displayed during a session when students need to record their attendance.
If you choose to use a QR code, after saving these settings, you will see a QR code icon next to your sessions. When you click on that QR code icon, shown below, a new page will open with the QR code image that will take students directly to their attendance for that session. This image can then be copied and added to a powerpoint presentation or displayed during a session when students need to record their attendance.
Tracking Attendance by Groups
By default, all students in the course will be displayed when marking or reporting attendance. If you have groups of students in your Learn course and would like to filter the students shown on the attendance list by group, this can be done in the “Common Module Settings” for the Attendance activity. Sessions added after this setting has been turned on allow you to select the groups of students to add to a roster, as shown in the image below.
- Open your Attendance activity
- Use the gear icon in the top right to select “Edit Settings”
- Open the “Common Module Settings” category
- In the “Group Mode” dropdown, select you group choice from below
- Separate Groups- students can only see members in their own group
- Visible Groups- students are able to see members in other groups as well

Attendance Reporting
Coordinators and faculty are able to view and export reports for attendance activities. These are visible from the Report and Export tabs within the activity. Use the following link to learn more about these reports.